
Load Enhancements in Digimon Story Time Stranger let you sacrifice one Digimon to permanently strengthen another. The system sounds simple, but most players use it inefficiently by feeding Level 1 fodder and wondering why their Digimon are not getting meaningfully stronger. The difference between a good Load Enhancement and a wasted one comes down to knowing what actually transfers and what does not.
Here is exactly how the system works, the stat formula behind it, and the rules that separate efficient use from grinding in circles.
What Is Load Enhancement?

Load Enhancement is a feature that lets you convert one Digimon in your Reserve into raw data and feed it into another, permanently boosting the recipient’s stats, EXP, Talent Points, and Attachment Skills. The Digimon being fed called the fodder is consumed in the process and cannot be restored.
The feature becomes available early in the game during the ADAMAS mission, the first major quest. Once unlocked, it is accessible through the Digimon menu on your Digivice under the Load Enhancement option.
The core appeal is bypassing Bond Stat limits. After a Digivolution, a Digimon’s stat gains are capped by its Bond level. Load Enhancement sidesteps this restriction entirely by adding Cumulative Stats, the blue numbers that appear separately from Main Stats and persist through every Digivolution and De-Digivolution.
How to Use Load Enhancement
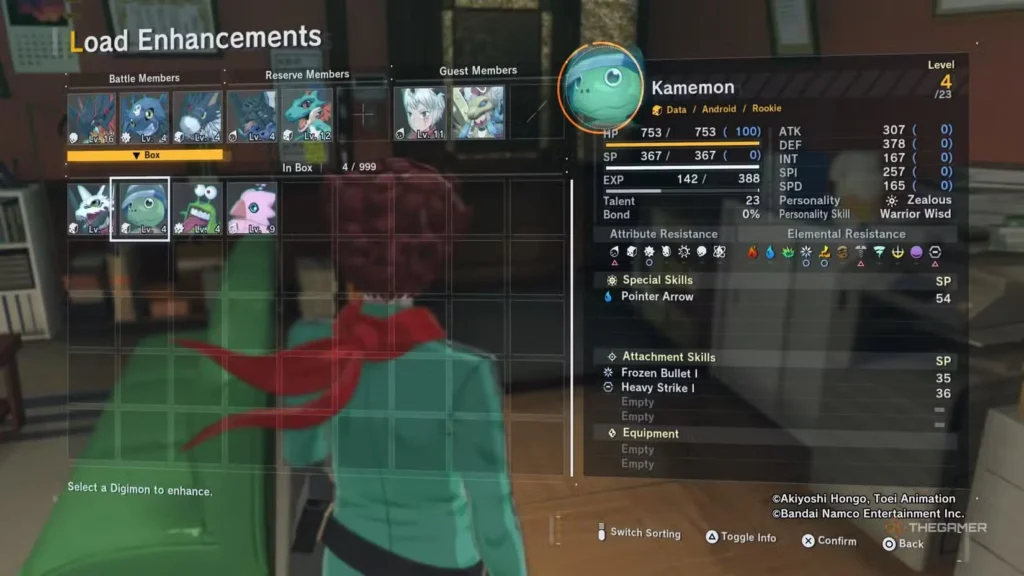
- Open the Digimon menu from your Digivice
- Select Load Enhancement
- Choose the Digimon you want to enhance as the recipient
- Choose the Digimon you want to use as fodder
If the fodder Digimon is locked or protected, press R3 on the controller or the P key on the keyboard at the Details Screen to unlock it first. Locked Digimon cannot be selected as fodder until manually unlocked, this prevents accidentally consuming a party member you wanted to keep.
The conversion is immediate and irreversible. Confirm your selection carefully before committing.
What You Actually Gain
Four things transfer when you use Load Enhancement:
- EXP. The recipient gains experience based on the level and Digivolution stage of the fodder. Higher level, higher stage, more EXP. A Level 1 Rookie provides much less EXP than a Level 50 Champion.
- Talent Points. Talent determines a Digimon’s level cap. Gaining Talent through Load Enhancement lets you push the recipient higher without grinding battles.
- Cumulative Stats (blue stats). These are permanent additional stats shown in blue brackets next to the main stat values. They carry through every Digivolution and De-Digivolution and are the primary reason to care about Load Enhancement. See the formula section below for exactly how much transfers.
- Attachment Skills. Any Attachment Skills the fodder has both equipped and unequipped transfer to the recipient. This includes skills the fodder earned by reaching specific levels during its lifetime.
One important note: Bond does not transfer through Load Enhancement. Bond must be built through active combat and interaction. This means a Digimon that has only been trained in the DigiFarm and never fought will not pass Bond to the recipient.
The Blue Stat Formula Explained
This is the part most guides skip, and it is why Level 1 fodder is nearly useless for stat gains.
The formula for blue stats gained through Load Enhancement is: Blue Stat Gained = [(Fodder’s Current Stat – Fodder’s Base Level 1 Stat) x 5%] + (Fodder’s Existing Blue Stats x 50%)
Breaking this down with a practical example: if you feed a Biyomon at Level 10 with 500 INT, and its base INT at Level 1 is 400 INT, the difference is 100. Five percent of 100 is 5 points of bonus INT transferred to the recipient.
The second part of the formula covers existing blue stats on the fodder. If your Biyomon already had 200 blue INT from previous Load Enhancements or Digivolution cycles, 50% of that 100 points also transfers.
This means the most efficient fodder is a Digimon that has been leveled up significantly and preferably already has its own blue stats accumulated. The higher the level, the higher the stat differential, the more transfers.
Why Level 1 Fodder Is a Waste
If you feed a Level 1 Digimon with no existing blue stats, the formula produces zero bonus stats. The entire first term of the formula is zero because the current stat equals the base stat. The second term is also zero because the fodder has no blue stats of its own.
The only thing you get from a Level 1 fodder with no blue stats is EXP. For an unleveled fresh scan, that EXP is minimal. You are not losing anything by doing this, it is better than nothing but players who think they are optimizing by feeding large quantities of Level 1 fodder are leaving significant stat gains on the table.
The correct approach: scan a Digimon, convert it at 100% scan rate, let it level up in your box or through DigiFarm training, and then use it as fodder once it has accumulated meaningful stats. The same Biyomon at Level 30 transfers far more than it would at Level 1.
Attachment Skills Transfer Too
When the fodder is consumed, all of its Attachment Skills both the ones it has equipped and the ones sitting unequipped in its skill list transfer to the recipient. This happens automatically without any extra steps.
This makes Load Enhancement useful beyond stat optimization. If a fodder Digimon learned a skill by reaching a specific level that you want on your main party member, feeding it transfers that skill. Digimon that branch through different Digivolution paths accumulate different skills, so covering multiple paths through fodder is a practical way to build out a recipient’s skill pool without grinding each path yourself.
When to Use Rare Digimon as Fodder
Rare and difficult-to-obtain Digimon offer exceptional stat transfers because they tend to have higher base stats and rarer Attachment Skills. The temptation to use them as fodder is real, especially if you have duplicates.
The rule of thumb before using any rare Digimon as fodder: make sure you can get it back. If the Digivolution path is already known to you and the scan rate is manageable, feeding a spare copy is low-risk. If the species only appears in one location, requires a rare scan, or is tied to a limited event, think twice.
Common and Uncommon species Numamon, basic Rookies, anything you can rescan in the field easily are ideal fodder because there is no meaningful downside to using them. Rarer species are conditionally worth it once you have confirmed a path back to them.
Load Enhancement and De-Digivolution
De-Digivolution reduces a Digimon back to Level 1, but it retains a portion of the stat gains from its previous iterations as blue stats. This means the De-Digivolution loop and Load Enhancement are complementary systems.
A Digimon that has De-Digivolved once and been raised back up will have accumulated blue stats from its previous form. Using it as fodder at that point transfers both the stat differential from leveling and 50% of those existing blue stats to the recipient a significantly higher transfer than a fresh Digimon at the same level.
You can De-Digivolve a Digimon up to 100 times per species. Each cycle accumulates more blue stats, making later iterations increasingly valuable as fodder. The practical benefit is that a Digimon you have cycled multiple times is worth far more as Load Enhancement material than one that has only ever leveled in a straight line.
Three Questions to Ask Before Sacrificing
Before committing a Digimon to Load Enhancement, ask:
- Is it a species you can easily obtain again? If yes, proceed without hesitation.
- Does the recipient meaningfully benefit from the stats or Attachment Skills it will gain? If yes, the sacrifice is productive.
- Is the fodder rare, event-limited, or difficult to rescan? If yes, hold off unless you have a confirmed path to getting it back.
If the answer to the first two is yes and the third is no, the Load Enhancement is worth doing. If you are unsure about the third, scan a replacement before committing.
What does Load Enhancement do in Digimon Story Time Stranger?
It converts one Digimon into data that permanently boosts another with EXP, Talent Points, Cumulative Stats shown in blue, and Attachment Skills. The Digimon used as fodder is consumed and cannot be restored.
Does Bond transfer through Load Enhancement?
No. Bond must be built through active combat and interaction. Load Enhancement transfers EXP, Talent, blue stats, and Attachment Skills only.
Why am I not getting blue stats from Load Enhancement?
You are likely feeding Level 1 Digimon with no existing blue stats of their own. Level 1 fodder with no blue stats produces zero bonus stat transfer. Only EXP transfers in that case. Level up your fodder before using it for meaningful blue stat gains.
What is the blue stat formula in Digimon Story Time Stranger?
Blue Stat Gained = [(Fodder’s Current Stat – Fodder’s Level 1 Base Stat) x 5%] + (Fodder’s Existing Blue Stats x 50%). Higher-level fodder with its own accumulated blue stats transfers the most.
Do Attachment Skills carry over through Load Enhancement?
Yes. Both equipped and unequipped Attachment Skills from the fodder transfer to the recipient automatically.
When does Load Enhancement unlock?
It becomes available early in the game during the ADAMAS mission, the first major quest in Digimon Story Time Stranger.
Can I use a party member as fodder accidentally?
Protected or locked Digimon cannot be selected as fodder. Press R3 on the controller or the P key on keyboard at the Details Screen to unlock a Digimon before it can be used. This is a deliberate safeguard against accidental sacrifice.
Load Enhancement is one of the most powerful progression systems in the game once you understand that level matters as much as which Digimon you are feeding. The difference between Level 1 fodder and properly leveled fodder with accumulated blue stats is the difference between minimal gains and noticeable permanent boosts that compound through every Digivolution cycle.
